Tensorflow Object Detection API 설치하기

Tensorflow Object Detection API

이번 포스트에서는 Tensorflow Models에 포함된 Object Detection API를 설치하는 방법에 대해 소개하겠습니다. 원글 내용은 여기를 참고하세요.

Object Detection에 대한 간략한 소개는 이전 포스트를 참고해주세요.

Tensorflow Object Detection API 설치하기 [원문 링크]

의존성라이브러리 설치

Tensorflow의 Object Detection API를 활용하기 위해서는 먼저 다음의 library들을 설치해야 합니다.

  • Protobuf 3.0.0
  • Python-tk
  • Pillow 1.0
  • lxml
  • tf Slim (which is included in the “tensorflow/models/research/” checkout)
  • Jupyter notebook
  • Matplotlib
  • Tensorflow
  • Cython
  • contextlib2
  • cocoapi

만약 anaconda를 이용해서 python을 설치한 후, Tensorflow까지 설치하셨다면, 대부분은 이미 설치되어있습니다. 그러나 만약 설치가 안되있다면 다음의 pip 및 apt-get 명령어를 통해 의존성 라이브러리들을 설치합니다.

# For CPU
pip install tensorflow
# For GPU
pip install tensorflow-gpu

sudo apt-get install protobuf-compiler python-pil python-lxml python-tk
pip install --user Cython
pip install --user contextlib2
pip install --user jupyter
pip install --user matplotlib

pip install --user Cython
pip install --user contextlib2
pip install --user pillow
pip install --user lxml
pip install --user jupyter
pip install --user matplotlib

** for windows ** - window에서는 다음의 링크를 참고해서 protobuf를 설치합시다. Windows Protobuf How To

tensorflow/models 다운로드

Tensorflow Object Detection API를 사용하기위해, 먼저 github repo인 tensorflow/models를 클론(다운로드)합니다.

git clone https://github.com/tensorflow/models

COCO API 설치

다음으로 cocoapi를 다운로드받고, pycocotools라는 폴더를 tensorflow/model/research 폴더에 복사합니다.

git clone https://github.com/cocodataset/cocoapi.git
cd cocoapi/PythonAPI
make
cp -r pycocotools <path_to_tensorflow>/models/research/

pycocotools는 Object Detection 모델을 evaluation 할 때 사용하는 evaluation metrics로 사용됩니다. 이후 COCO evaluation metrics를 사용하지 않더라도, Tensorflow Object Detection API는 내부적으로 COCO evaluation metrics를 기본으로 사용하기 때문에 필수적으로 설치하셔야합니다.

(원문에서는 coco evaluation metrics가 흥미로우면 설치하라고 되어있고, default로 Pascal VOC evaluation metric를 사용한다고 되어있는데, 제가 실제로 해본 결과 기본적으로 cocoapi 설치가 필요하고, default도 Pascal VOC가 아닌것같습니다.)

Protobuf 컴파일

Tensorflow Object Detection API는 Object Detection 모델들의 하이퍼파라미터 설정이나 학습에 적용할 파라미터등을 Protobuf를 사용해서 설정합니다. 따라서 API를 사용하기위해서는 먼저 Protobuf 라이브러리를 컴파일해야합니다. Protobuf 라이브러리 컴파일은 다음의 명령어를 사용해서 수행할 수 있습니다.

# From tensorflow/models/research/
protoc object_detection/protos/*.proto --python_out=.

PYTHONPATH에 tensorflow/model/research와 slim 폴더 경로 추가

본인의 로컬 컴퓨터에서 API를 활용하기 위해서는, tensorflow/models/research/ 와 slim 폴더가 PYTHONPATH에 등록되어있어야 합니다. 다음의 명령어를 통해 PATH를 등록합니다.

# From tensorflow/models/research/
export PYTHONPATH=$PYTHONPATH:`pwd`:`pwd`/slim

이 명령어는 터미널을 열 때마다 실행해줘야 합니다. 자동으로 PATH 등록이 되도록 하고 싶다면 ~/.bashrc 파일에 PATH를 추가하세요.

설치 확인

앞선 과정을 제대로 수행했다면, 다음의 python 파일을 실행해서 설치 결과를 확인할 수 있습니다.

python object_detection/builders/model_builder_test.py

Python 3.x 버전 오류

Tensorflow Object Detection API를 직접 사용해본 결과, Python 3.x 버전에서는 꾀 많은 오류가 발생합니다. 이러한 오류는 tensorflow/models github repo의 issues에서 쉽게 찾아보실 수 있습니다.

설치가 완료되었다면, 이제 다음 링크를 클릭하여 Tensorflow Object Detection API에서 제공하는 Object Detection 모델을 학습하는 방법에 대해 살펴봅시다.

Tensorflow Object Detection API을 활용한 모델 학습하기

References

[1] Tensorflow Object Detection API - https://github.com/tensorflow/models/tree/master/research/object_detection

Tensorflow Models

Tensorflow Models

이번 포스트에서는 Tensorflow github repo에 포함된 Tensorflow Models에 대해서 소개해보겠습니다.
원글 내용은 여기를 참고하세요.
Tensorflow Models github 페이지에는 다음과 같이 4가지 폴더로 구성되어 있습니다.

  • official models

    official models에는 Tensorflow의 high-level API를 이용한 example 모델들이 포함되어 있습니다. Tensorflow 그룹에서는 처음 Tensorflow를 사용하는 사용자들에게 이 예제부터 시작하라고 권장하고 있습니다.

  • research models

    research models에는 연구자들에의해 구현된 여러가지 모델들이 포함되어 있습니다.

    특히 이 폴더에는 CNN, RNN 등 뿐만 아니라, AutoEncorder, Object Detection 등 인공지능 분야에서 연구되었던 다양한 딥 러닝 모델들이 Tensorflow로 구현되어 있습니다.

    다음의 블로그 포스트에서는 Tensorflow Models/research에 포함된 모델들을 사용하는 방법들에 대해서 소개하겠습니다.

  • samples folder

    samples folder에는 다양한 블로그 포스트에서 소개된 코드들이 있고, Tensorflow의 기능을 잘 소개하는 code snippet과 smaller model들이 포함되어 있습니다.

  • tutorials folder

    tutorial folder에는 Tensorflow tutorials에 소개된 모델들이 포함되어 있습니다.

References

[1] Tensorflow Models github repo - https://github.com/tensorflow/models

CNN Models

이 포스트에서는 다음과 같은 CNN Model 들과, 각 Model 에서 도입한 주요 컨셉들에 대해 살펴보겠습니다.

  • 본 포스트의 내용은 coursera와 같은 온라인 강의와 다양한 블로그들을 통해 학습한 내용을 바탕으로 이해한 내용을 정리했기 때문에, 다소 부정확할 수도 있습니다. 조만간 관련 논문들을 읽고 좀더 디테일하게 정리할 예정입니다.

전통적인 CNN 모델

  1. LeNet
  2. AlexNet
  3. VGGNet

2015년 이후의 CNN 모델

  1. GoogLeNet(Inception)
  2. ResNet
  3. DenseNet
  4. XceptionNet

LeNet

AlexNet

VGGNet

GoogLeNet(Inception)

먼저 GoogLeNet(Inception) 모델에 대해 살펴보기 전에, 먼저 1x1 Convolution 연산의 개념과 Network In Network 라는 컨셉에 대해 알아봅시다.

1x1 Convolution 연산은 말 그대로, Convolution filter 의 크기가 1x1 이라는 것을 의미하며 다음 그림과 같이 표현될 수 있습니다.

1 Channel 입력에 대한 1x1 Convolution 연산

위 그림에서 보이는 것과 같이 1x1 Convolution 연산은 단순히 각각의 입력 값에 1x1, 즉 하나의 값만 곱한 결과와 같습니다.

1 Channel 을 갖는 입력에 대해 (1개의 filter 를 갖는) 1x1 Convolution 연산은 Convolution 연산에서 얻을 수 있는 이점이 전혀 없어 보입니다. 하지만 다음 그림과 같이 여러개의 Channel 을 갖는 입력에 대해 1x1 Convolution 연산을 취하게 되면 특별한 결과를 얻을 수 있습니다.

10 Channel 입력에 대한 1x1 Convolution 연산

10개의 Channel 을 갖는 입력에 대해 (1개의 filter 를 갖는) 1x1 Convolution 연산을 취하면, 1개 Channel 을 갖는 결과를 얻을 수 있습니다.

여기서 주목할 점은, 1x1 Convolution 연산을 통해 출력 Channel 의 크기를 자유롭게 변경시킬 수 있다는 점입니다.

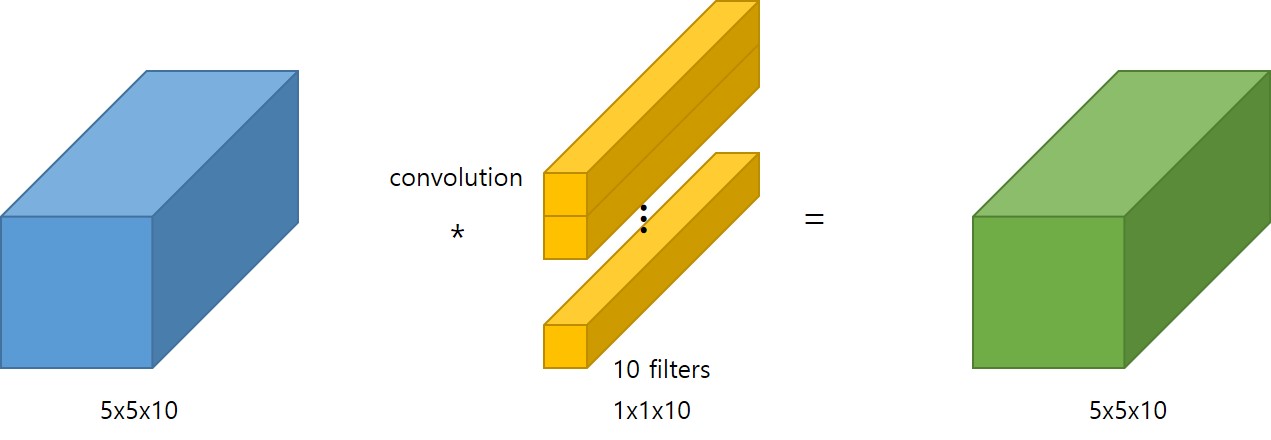
예를들어, 10개의 Channel 을 갖는 입력에 대해 10개의 filter 를 갖는 1x1 Convolution 연산을 취하게 되면, 다음 그림과 같이 10개의 Channel 을 갖는 결과를 얻을 수 있습니다.

10 Channel 입력에 대한 10개 filter를 갖는 1x1 Convolution 연산

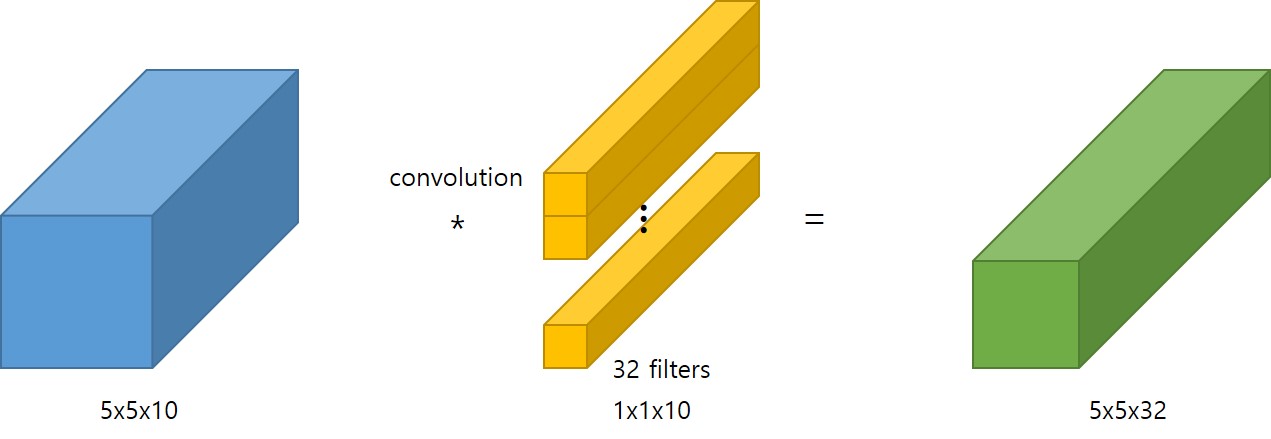
마찬가지로 32개의 filter 를 갖는 1x1 Convolution 연산을 취하면 32개의 Channel 을 갖는 결과를 얻을 수 있습니다.

10 Channel 입력에 대한 32개 filter를 갖는 1x1 Convolution 연산

위와 같이 1x1 Convolution 연산을 취하게 되면, filter 의 개수에 따라 size 는 유지하면서 Channel 의 크기를 바꿀 수 있으며, Channel 의 크기를 작게함으로써 연산량을 크게 줄일 수 있습니다.

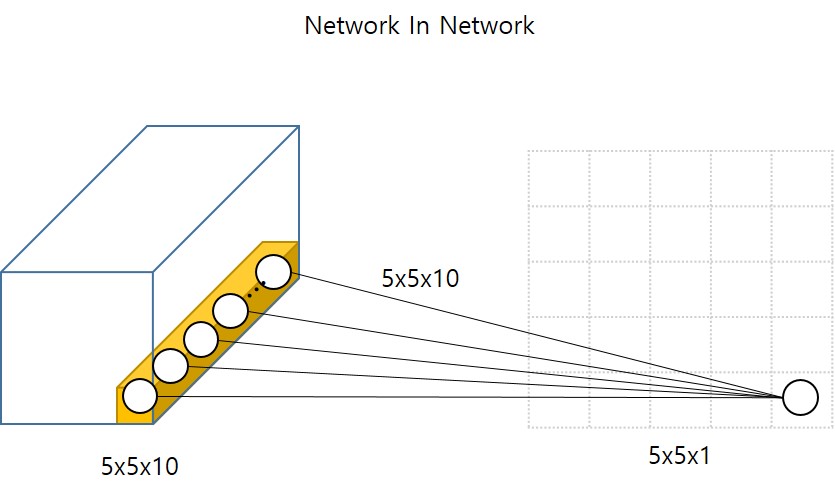
그렇다면 1x1 Convolution 연산과 Network In Network 라는 컨셉의 관계는 무엇일까요? Network In Network 라는 개념을 알아보기 위해 다음 그림을 살펴봅시다.

1x1 Convolution 연산과 Network In Network

이 그림은 5x5 크기와 10개의 Channel 을 갖는 입력에 대해 1개의 filter 를 갖는 1x1 Convolution 연산을 수행하는 것을 도식화한 것입니다.

그림에서 보이는 것과 같이, 1x1 Convolution 연산은 Channel 에 대해 일반적인 Neural Network(MLP)를 수행하는 것과 유사해보입니다. 따라서 연산 관점에서(Network in) Network 를 적용했기 때문에 Network In Network 라고 부른 것 같습니다. (제가 이해하기로는…)

1x1 Convolution 연산의 또 다른 이점은 비선형성(non linearity)을 부여할 수 있다는 점입니다. 즉 비선형성을 적용하면서 원하는 크기의 Channel 의 출력을 도출할 수 있다는 점입니다. 당연히 1x1 Convolution 연산 이후 “relu”와 같은 non linear activation 함수를 적용하면 비선형성을 적용한 결과를 얻을 수 있겠죠

자, 이제 이러한 1x1 Convolution 연산에 대한 내용을 숙지하고, google 연구팀이 개발한 GoogLeNet(inception)에 대해 살펴봅시다. 이름이 GoogLeNet(inception)인 이유는, CNN 연구의 시작을 알린 LeNet에 대한 경의를 표하기 위함이라고 합니다. inception 이라는 이름은 또 다른 이름인데, inception 영화의 “We Need To Go Deeper” 라는 표현에 영감을 받아 사용했다고 하네요.

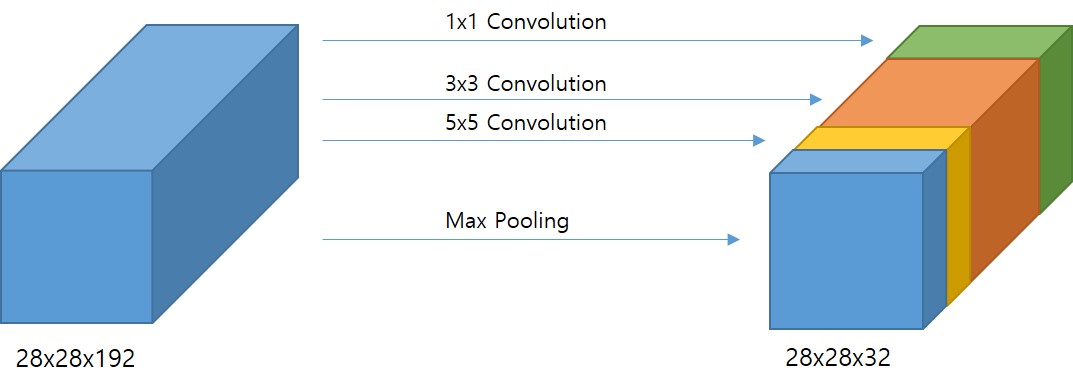
만약 CNN 모델을 디자인하고자 한다면 Convolutional Layer의 filter 크기를 1x3으로 할지, 3x3으로 할지, 5x5로 할지, 어느 시점에 어떤 크기의 pooling layer를 적용할지를 고민해야 합니다.

여기서 GoogLeNet(inception) 모델이 시도한 것은, “이것들 전부를 적용하자!” 입니다. 다음 그림은 이러한 개념을 적용한 GoogLeNet(inception) 의 inception 모듈을 개략적으로 도식화한 것입니다.

inception 개념

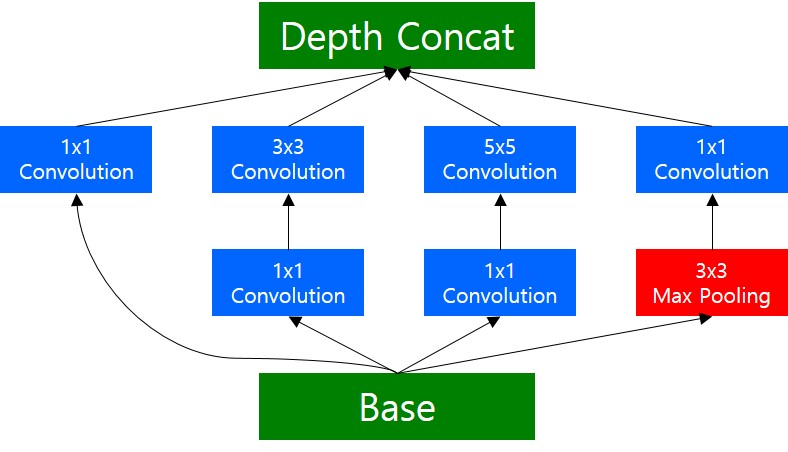
당연히 이러한 개념은 하나의 입력에 대해 다양한 크기의 filter 를 갖는 convolution 연산을 취함에 따라, 학습이 필요한 파라미터수가 크게 증가해서 연산량이 많아지는 문제가 발생합니다. 이때, 1x1 Convolution 연산을 적용해서, 먼저 입력 차원을 줄인 후, 3x3, 5x5 Convolution 연산을 수행하면 연산량을 효과적으로 줄일 수 있습니다. 다음 그림은 실제 GoogLeNet(inception)에서 사용한 inception module 을 도식화 한 것입니다.

1x1 Convolution 을 적용한 실제 inception module

그림에서 보이는 것과 같이, 3x3, 5x5 Convolution 연산의 연산량을 줄이기 위해, 바로 전에 1x1 Conovolution 연산을 적용하여 입력 차원을 줄이고, 3x3, 5x5 Convolution 을 수행하는 것을 확인할 수 있습니다. Max Pooling 의 경우 순서가 다른데, Pooling 연산의 경우, Channel 의 크기를 변경시키지 않기 때문에, Pooling 연산을 수행한 후, 1x1 Convolution 연산을 통해 Channel(Depth) 를 맞춰주는 역할을 합니다.

이러게 정의된 inception module 들을 이어붙인것이 GoogLeNet(inception) 이며, 도식은 다음과 그림과 같습니다.

1x1 Convolution 을 적용한 실제 inception module

최근에는 inception_v2, inception_v3, inception_v4, inception과 resnet을 결합한 inception_resnet 등등 inception module을 기반으로 한 다양한 모델이 연구되었는데, 조만간 공부해서 정리해보겠습니다~

ResNet

ResNet 에서 도입한 가장 중요한 키 컨셉은 Skip Connection(short cut) 입니다. 기존의 CNN을 포함한 모든 Neural Network 는 네트워크가 깊어지면(히든 레이어가 많아지면) 학습 시 gradient 가 매우 작아지거나 커지는 vanishing/exploiting gradient 문제가 발생합니다. ResNet 에서는 이러한 문제를 해결하기위해 Skip Connection(short cut) 이라는 개념을 도입했는데, 한번 살펴봅시다.

먼저 Skip Connection(short cut) 이란, 몇 단계 이전 레이어에서의 출력을 현재 레이어의 출력(activation 이전)에 더하는 것을 의미합니다. 간단하게 도식화하면 다음 그림과 같이 표현할 수 있습니다.

1x1 Convolution 을 적용한 실제 inception module

여기서 주목할만한 점은, 이러한 Skip Connection(short cut) 이 항등 함수를 학습하기 쉽게 만들어준다는 점입니다. 예를들어, 일반적인 Neural Network 의 \(l+2\) 번째에 레이어에 대한 activation 결과를 수식으로 표현하면 다음과 같이 표현됩니다.

\[a^{[l+2]} = g(z^{[l+2]}) \\ a^{[l+2]} = g(w^{[l+2]}a^{[l+1]} + b^{[l+2]})\]

이제, Skip Connection(short cut) 을 적용해봅시다.

\[a^{[l+2]} = g(z^{[l+2]} + a^{[l]}) \\ a^{[l+2]} = g(w^{[l+2]}a^{[l+1]} + b^{[l+2]} + a^{[l]})\]

이렇게 Skip Connection(short cut) 이 적용된 수식에서, 현재 레이어(\(l+2\)) 의 weight와 bias가 0이 된다고 가정해보면, 다음과 같은 항등 함수 형태로 표현될 수 있습니다.

\[a^{[l+2]} = g(a^{[l]})\]

그 결과, 네트워크의 깊이가 깊어져도, gradient 를 최대한 유지하면서 학습시킬 수 있게 되는것 같습니다.(아직 논문을 보고 확신한게 아니라서,…)

DenseNet

XceptionNet

Tensorflow High Level API - Estimator

Estimators

이번 포스트에서는 텐서플로우의 High Level API인 Estimator에 대해 알아보겠습니다. 이 포스트는 Tensorflow Document-https://www.tensorflow.org/programmers_guide/estimators를 참조해서 작성했습니다.

Estimator는 다음과 같이 4가지 액션으로 캡슐화되어 있습니다.

  • training
  • evaluation
  • prediction
  • export for serving

Advantages of Estimators

  • Estimator 기반으로 모델을 구현하면, 모델의 변경 없이 CPU, GPU, TPU 등 다른 환경의 컴퓨팅 환경에서 실행할 수 있습니다.
  • Estimators는 모델 개발자들간에 쉽게 개발결과를 공유할 수 있도록 도와줍니다.
  • low-level TF API 보다 개발이 쉽습니다.
  • Estimators는 tf.layers로 구현되어, 쉽게 커스터마이징이 가능합니다.
  • Estimators는 자동으로 graph를 빌드하기 때문에, graph 빌드를 고려하지 않아도 됩니다.
  • Estimators는 안전한 training loop를 제공합니다.
    • build the graph
    • initialize variables
    • start queues
    • handle exceptions
    • create checkpoint files and recover from failures
    • save summaries for TensorBoard

Estimators로 모델을 개발할 경우, 반드시 input pipeline과 model을 나누어서 구현해야 합니다.

Pre-made Estimators

Estimators로 모델을 구현할 경우, low level TF API를 사용할때와는 달리, Graph나 Session을 고려할 필요가 없습니다. 또한, Pre-made model을 제공하는데 일부 코드만 변경하면 다른 데이터셋에서 쉽게 적용해서 모델을 사용할 수 있습니다. DNNClassifier

Structure of a pre-made Estimators program

pre-made Estimator로 TF 모델을 개발하는 방법은 다음과 같은 4가지 단계로 구분됩니다.

  1. Write one or more dataset importing function
    • training을 위한 데이터셋과 test를 위한 데이터셋을 불러오기 위한 함수를 구현합니다. 각각의 함수는 반드시 2개의 object를 반환해야 합니다.
      • dictionary : keys는 feature 이름, values는 feature data에 해당하는 Tensor 또는 SparseTensor로 구성된 dictionary object
      • Tensor : 하나이상의 레이블로 구성된 Tensor
    • 함수의 예는 다음과 같습니다.
    • 데이터셋을 불러오는 자세한 방법에 대한 내용은 https://www.tensorflow.org/programmers_guide/datasets 를 참고합시다.
def input_fn(dataset):
   ...  # manipulate dataset, extracting feature names and the label
   return feature_dict, label
  1. Define the feature columns
    • tf.feature_column을 이용해서, feature name, type, pre-processing 등을 정의합니다.
# Define three numeric feature columns.
population = tf.feature_column.numeric_column('population')
crime_rate = tf.feature_column.numeric_column('crime_rate')
median_education = tf.feature_column.numeric_column('median_education',
                    normalizer_fn='lambda x: x - global_education_mean')
  1. Instantiate the relevant pre-made Estimator
    • pre-made Estimator 의 인스턴스를 생성합니다.
# Instantiate an estimator, passing the feature columns.
estimator = tf.estimator.Estimator.LinearClassifier(
    feature_columns=[population, crime_rate, median_education],
    )
  1. Call a training, evaluation, or inference method
    • train, eval, predict 함수를 호출해서 학습시키거나 evaluation, prediction을 수행합니다.
# my_training_set is the function created in Step 1
estimator.train(input_fn=my_training_set, steps=2000)

Benefits of pre-made Estimators

Pre-made Estimators encode best practices, providing the following benefits:

  • Best practices for determining where different parts of the computational graph should run, implementing strategies on a single machine or on a cluster.
  • Best practices for event (summary) writing and universally useful summaries. If you don’t use pre-made Estimators, you must implement the preceding features yourself.

Custom Estimators

  • 커스텀 Estimator를 구현하기 위해서는 먼저 training, evaluation, prediction을 위한 graph를 빌드할 수 있는 model 함수를 구현해야 합니다. 이에 대한 자세한 내용은 https://www.tensorflow.org/get_started/custom_estimators 를 참고합시다.

We recommend the following workflow:

  1. Assuming a suitable pre-made Estimator exists, use it to build your first model and use its results to establish a baseline.
  2. Build and test your overall pipeline, including the integrity and reliability of your data with this pre-made Estimator.
  3. If suitable alternative pre-made Estimators are available, run experiments to determine which pre-made Estimator produces the best results.
  4. Possibly, further improve your model by building your own custom Estimator.

Creating Estimators from Keras models

You can convert existing Keras models to Estimators. Doing so enables your Keras model to access Estimator’s strengths, such as distributed training. Call tf.keras.estimator.model_to_estimator as in the following sample:

# Instantiate a Keras inception v3 model.
keras_inception_v3 = tf.keras.applications.inception_v3.InceptionV3(weights=None)
# Compile model with the optimizer, loss, and metrics you'd like to train with.
keras_inception_v3.compile(optimizer=tf.keras.optimizers.SGD(lr=0.0001, momentum=0.9),
                          loss='categorical_crossentropy',
                          metric='accuracy')
# Create an Estimator from the compiled Keras model. Note the initial model
# state of the keras model is preserved in the created Estimator.
est_inception_v3 = tf.keras.estimator.model_to_estimator(keras_model=keras_inception_v3)

# Treat the derived Estimator as you would with any other Estimator.
# First, recover the input name(s) of Keras model, so we can use them as the
# feature column name(s) of the Estimator input function:
keras_inception_v3.input_names  # print out: ['input_1']
# Once we have the input name(s), we can create the input function, for example,
# for input(s) in the format of numpy ndarray:
train_input_fn = tf.estimator.inputs.numpy_input_fn(
    x={"input_1": train_data},
    y=train_labels,
    num_epochs=1,
    shuffle=False)
# To train, we call Estimator's train function:
est_inception_v3.train(input_fn=train_input_fn, steps=2000)

Note that the names of feature columns and labels of a keras estimator come from the corresponding compiled keras model. For example, the input key names for train_input_fn above can be obtained from keras_inception_v3.input_names, and similarly, the predicted output names can be obtained from keras_inception_v3.output_names.

For more details, please refer to the documentation for tf.keras.estimator.model_to_estimator.

References

[1] imgaug - image Augmentation
[2] Tensorflow Document - Reading Data
[3] Caffe to Tensorflow - PreTrained Model
[4] Deep Learning Model Convertor

A Very Good Keras!!

Keras 소개

2017년도경 Keras가 Tensorflow의 코어 라이브러리로 지원되기 시작했지만, 나는 최근까지 이 유용한 라이브러리를 사용하지 않는 고집을 부리고 있었다..
내가 Keras를 사용하지 않고, pure한 Tensorflow를 사용하기를 고집한 이유는 Keras를 사용하면 왠지 세세한 weight 조정이나 여러가지 제약이 있지 않을까라는 무의미, 무책임한 사고방식에서였다. 그런데 최근 Keras를 사용해보고나니 말도 안되게 편한 Library였다는 것을 새삼 깨닫는다..
Keras를 잠깐 사용하면서 느꼇던 것은, pure한 Tensorflow를 사용해서 코드를 구현할 때에 비해 Data Reading부터 Model, 최적화등을 약 2~3배 이상 빠르게 구현할 수 있을 정도로 간편하다는 것이다. 게다가, 앞서 말했던 세세한 weight 파라미터, Layer의 조정등도 매우 간편하게 수행할 수 있다.


따라서! 이번 포스트에서는 그렇게 간단하게 조작할 수 있었던 Keras에 대해 살펴보도록 하자.
아직 나 자신도 Keras나 Tensorflow에서 매우 뛰어난 전문가가 아니고, 죄다 인터넷에서 검색하고 찾아본 내용을 정리한 것이니, 전문적인 내용은 Tensorflow나 Keras 공식 홈페이지의 Document를 확인하는 것이 가장 이해하기 쉬울 수 있다.

기본 활용 방법 구성

  • 수집된 데이터 가공
    • 폴더 구성
  • Data Augmentation
  • Reading Data
  • Model 구현
  • Optimizing
  • Classification

수집된 데이터 가공

앞서 Tensorflow에서는 수집한 데이터를 train, validation으로 나누고, csv 파일로 라벨링을 하는 등의 데이터 가공 프로세스를 별도로 구현할 필요가 있었다.
그러나 Keras에서는 정말 매우매우 간단/간편하게 데이터를 폴더별로 구분만 해 놓으면 된다!!
예를들어 다음 폴더 구성과 같다.

 .
├── train(folder)
│   └── label1
│           └── XXX-3.jpeg
│           └── ...
│   └── label2
│           └── XXX-3.jpeg
│           └── ...
├── validation(folder)
│   └── label1
│           └── XXX-3.jpeg
│           └── ...
│   └── label2
│           └── XXX-3.jpeg
│           └── ...
 .

이렇게만 구성해놓으면, keras의 ImageDataGenerator 라이브러리가 다 알아서 읽어들여서, 다 알아서 Augmentation하고, 다 알아서 라벨링도 한다!!

Data Augmentation

Keras에서는 앞서 소개한 ImageDataGenerator 라이브러리를 제공하는데, 뛰어나게도 이 라이브러리는 Augmentation도 지원한다.
아마 심플한 이미지 분류 작업에서 필요한 왠만한 Augmentation 방법은 다 제공하는것 같다. 대표적으로 horizontal/vertical filp, shift, rotate같은 것들이다. 자세한 코드는 뒤에서 소개한다.

Reading Data

Tensorflow Document에서는 이전에 작성했던 포스트에서와같이 Data를 읽어들이는 방법으로 3가지를 제시하는데, 이 3가지 방식을 적용해서 model로 읽어들이는데에도 물론 코딩이 필요하다.
특히 Disk에서 파이프라인 형태로 데이터를 조금씩 읽어들이면서 모델을 학습시키려면, tread도 구현해야되고, queue도 구현해야되고,,,,,,
다행스럽게도 Keras의 ImageDataGenerator 라이브러리는 이러한 기능도 제공을 해서, 단순히 폴더 경로와 이미지 크기, batch_size 등등만 설정해서 호출하면, 마치 우리가 정제된 MNIST 데이터셋을 불러다 쓰는 것처럼 편리하게 사용할 수 있다. 이제 ImageDataGenerator 라이브러리에 대한 코드를 살펴보자.

   from keras.preprocessing.image import ImageDataGenerator

   train_datagen = ImageDataGenerator(
       rescale=1./255,
       horizontal_flip=True,
       vertical_flip=True)

   validation_datagen = ImageDataGenerator(rescale=1./255)

   train_generator = train_datagen.flow_from_directory(
       'path/to/.../train',
       target_size=(128, 128),
       batch_size=32,
       class_mode='binary')

   validation_generator = validation_datagen.flow_from_directory(
       'path/to/.../validation',
       target_size=(128, 128),
       batch_size=32,
       class_mode='binary')

위 코드를 살펴보면 알수있다싶이 ImageDataGenerator는 keras.preprocessing.image 모듈내에 있으니까 상단 코드와 같이 import를 시켜주고, train, validation 각각 ImageDataGenerator에 대한 인스턴스를 생성한다. 인스턴스를 생성할 때, 생성자 인자로 보이는 것중에 rescale, horizontal_filp, vertical_filp이 보이는데 이 인자들이 augmentation 방법과 그 파라미터이다. 이후, 생성한 인스턴스의 flow_from_directory 함수를 호출해서 Disk로부터 데이터를 읽어들이면 끝! 정말 간단하지 않나요?? 그 함수 인자로도 위 코드에서 보이는것처럼 train, validation 폴더 path랑 입력 이미지 크기, 배치사이즈가 끝이라는게…

Model 구현

이제 Keras를 통해, 커스텀 데이터를 쭉 읽어들일 수 있게 되었으니 Classification 모델을 구성할 차례이다. 먼저 모델을 구성하는 코드를 살펴보자.

from keras.models import Sequential
from keras.layers import Dense, Dropout, Activation, Flatten, Conv2D, MaxPooling2D
from keras.utils import np_utils
from keras.regularizers import l2

# Initialising the CNN
classifier = Sequential()

# Step 1 - Convolution
classifier.add(Conv2D(30, (5, 5), strides=(2, 2), input_shape=(128, 128, 3), activation='relu', kernel_regularizer=l2(0.0005)))
classifier.add(MaxPooling2D(pool_size=(2, 2)))

classifier.add(Conv2D(16, (3, 3), strides=(1, 1), activation='relu', kernel_regularizer=l2(0.0005)))
classifier.add(MaxPooling2D(pool_size=(2, 2)))

classifier.add(Conv2D(16, (3, 3), strides=(1, 1), activation='relu', kernel_regularizer=l2(0.0005)))
classifier.add(Dropout(0.25))
classifier.add(Flatten())
classifier.add(Dropout(0.5))
classifier.add(Dense(1, activation='sigmoid', kernel_regularizer=l2(0.0005)))

간단하게 CNN 모델을 구성하는 것으로 살펴보도록하자. CNN에는 기본적으로 Convolutional Layer, Pooling Layer, Fully Connected Layer 등등이 있는데, keras.layers 모듈에는 각 Layer를 구성할 수 있는 라이브러리가 다 있다. 따라서 코드 상단과 같이 Layer에 해당하는 라이브러리를 import한다.
이후 모델을 구성하기 위해 Sequential을 import 하자. import한 이후에는 당연히 모델 인스턴스를 Sequential로 생성하고 그 이후에는 간단하게 add()를 호출해서 네트워크 모델을 구성할 수 있다.
위 코드에서 보이는것처럼 add()함수의 인자로 앞서 import한 각 layer들의 인스턴스를 생성해서 넘겨주면 말 그대로 sequential하게 모델이 구성된다.
보통 Neural Network의 학습에서 Overfitting을 방지하기 위해서 종종 regularization을 사용하는데, 모델을 구성할 때, 각 layer의 인스턴스 생성자 인자로 kernel_regularizer를 위 코드와같이 넘겨주면 간단하게 추가할 수 있다.

Optimizing

이제 CNN 학습을 시작할 차례이다. CNN 학습에 대한 코드는 다음과 같다.

sgd = SGD(lr=0.01, momentum=0.99, decay=0.1, nesterov=False)

# Compiling the CNN
classifier.compile(optimizer=sgd, loss='binary_crossentropy', metrics=['accuracy'])

classifier.fit_generator(train_generator,
                         steps_per_epoch=250000,
                         epochs=300,
                         validation_data=validation_generator,
                         validation_steps=2000)

위 코드와 같이, 학습을 위한 Optimizer로 Stochastic Gradient Descent를 적용하고, classifier.compile()함수의 optimizer 파라미터 인자로 넘겨주면, 모델의 optimizer 설정까지 셋팅할 수 있다.
위 코드에서 loss는 ‘binary_corssentropy’로 설정했다.

마지막으로 앞서 ImageDataGenerator로 읽어들이는 데이터를 가지고 모델을 학습(fitting)하는 방법은 classifier.fit_generator() 함수를 사용하면 된다.
이렇게 설정한 이후 학습을 시작하면, 콘솔 화면에 알아서 각 epoch마다 걸리는 시간, training loss, training accuracy와 각 validation_step마다 validation loss와 validation accuracy가 알아서 프린팅된다.

Additional Contents

Setting weights

training이 끝난 이후, weights가 어떻게 바뀌었는지 궁금할 경우 다음과 같은 코드를 실행하면 쉽게 확인할 수 있다.

classifier.layers[0].get_weights()

앞서 구성한 모델은 conv, pooling, conv, conv, conv …로 구성되어있기 때문에, 레이어의 0번째 인자는 conv layer를 가리킨다. 따라서 위 코드를 실행하면, 학습된 모델의 첫 번째 conv 레이어의 weights 파라미터 값을 뽑아올 수 있다.
뿐만 아니라, training 전에 weights 값을 내가 정한 값으로 설정하고 싶은 경우, 아래 코드를 실행하면 쉽게 적용할 수 있다.

classifier.layers[0].set_weights(weight_param)

당연히 여기서 weight_param의 shape는 layers[0]의 shape와 동일해야 하며, numpy array를 넘겨주면 된다.

Model Saving

keras에서 model 학습 중, validation accuracy가 좋아질 때마다 모델을 저장하는 코드는 다음과 같다.

from keras.callbacks import ModelCheckpoint

filepath="checkpoint/weights-improvement-{epoch:02d}-{val_acc:.2f}.hdf5"
checkpoint = ModelCheckpoint(filepath, monitor='val_acc', verbose=1, save_best_only=True, mode='max')
callbacks_list = [checkpoint]

classifier.fit_generator(train_generator,
                         steps_per_epoch=100000,
                         epochs=100,
                         validation_data=validation_generator,
                         validation_steps=2000,
                         callbacks=callbacks_list)

위 코드와 같이 keras.callbacks 모듈의 ModelCheckpoint를 import한후, save file path를 정의한 후 ModelCheckpoint 인스턴스를 생성한 뒤, model의 fit()함수나 fit_generator함수의 callbacks함수로 넘겨준다. 이렇게 설정해놓으면 keras가 자동으로 epochs마다 validation accuracy가 이전보다 좋아질 때마다 모델을 저장한다.

freeze layer

경우에 따라서, 모델 학습 시 일부 layer의 parameter를 update하지 않고 싶은 경우가 있다. 이런 경우 layer 인스턴스 파라미터의 trainable을 False로 두면 된다. 관련 코드는 다음과 같다.

frozen_layer = Dense(32, trainable=False)

example:

x = Input(shape=(32,))
layer = Dense(32)
layer.trainable = False
y = layer(x)

frozen_model = Model(x, y)
# in the model below, the weights of `layer` will not be updated during training
frozen_model.compile(optimizer='rmsprop', loss='mse')

layer.trainable = True
trainable_model = Model(x, y)
# with this model the weights of the layer will be updated during training
# (which will also affect the above model since it uses the same layer instance)
trainable_model.compile(optimizer='rmsprop', loss='mse')

frozen_model.fit(data, labels)  # this does NOT update the weights of `layer`
trainable_model.fit(data, labels)  # this updates the weights of `layer`


ps. 이제까지 정말 Tensorflow로 삽질 많이 한것 같은데,,, 이제 keras 써서 겁나 편하게 코딩해야겠다.
ps. 블로그 포스트 말투가 오락가락하네요.. 블로그 시작한지 얼마 안되서 글 쓰는 형식이 안갖춰져서 끙,, 조만간 갖춰지겠죠?ㅋ